> For the complete documentation index, see [llms.txt](https://docs.realmjoin.com/llms.txt). Markdown versions of documentation pages are available by appending `.md` to page URLs; this page is available as [Markdown](https://docs.realmjoin.com/ja/to/self-service-forms.md).
# セルフサービス フォーム
RealmJoin Self Service Forms は、Support によって有効化されると、インシデント報告や変更要求などの構造化データをユーザーから収集します。
## 概要
Self Service Forms を使用すると、ユーザーから構造化データを収集できます。これは、インシデントの報告や変更の通知、たとえばオフィスに新しい作業環境のセットアップが必要になった場合などに使えます。
「Self Service Forms」は、RealmJoin Support によってあなたのテナントで有効化できる任意の機能です。有効化されていない場合でも、設定ページでフォームを入力・準備することはできますが、ユーザーは self service forms を表示・使用できません。
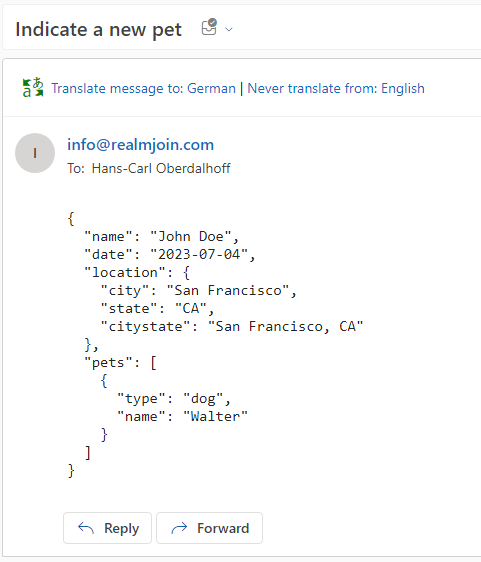
例として、「新しいペットを追加する」ワークフローを使用します。
{% hint style="info" %}
Self Service Forms があなたのテナントで有効化されると、すべてのユーザーがフォームを使用・送信できるようになります。
{% endhint %}
## 送信内容の確認
次の  ナビゲーションアイコンから、ユーザーの過去のフォーム送信内容を確認できます。
送信一覧
送信内容は、送信者のユーザー名とフォーム名で検索できますが、フォーム送信内のフィールドでは検索できません。
入力済みのフォームデータを表示するには「View」をクリックします。表示は読み取り専用です。
## 設定ページ
Self Service Forms の設定ページでは、既存フォームの管理、フォームの追加、編集、削除ができます。
### 設定ページ上のフォーム一覧
「Update JSON Form Preview」を使用すると、エディタの下に生成されるフォームのプレビューを作成できます。
エディタのプレビュー
スキーマを変更したら、「Submit」を押して変更を保存します。構文チェックに失敗するとエラーが表示されます。
## JSON Schema
JSON Schema の使用方法は、このドキュメントの範囲外です。オンラインのスキーマ生成ツール(たとえば [こちら](https://www.jsonschema.net/app))を使うと、手順を簡略化できます。
少なくとも出発点として、例のスキーマを見てみましょう
```json
{
"title": "人",
"type": "object",
"required": [
"name",
"date",
"location",
"pets"
],
"properties": {
"name": {
"type": "string",
"description": "姓と名",
"minLength": 4,
"default": "- ここにあなたの名前 -"
},
"date": {
"type": "string",
"format": "date",
"options": {
"flatpickr": {}
}
},
"location": {
"type": "object",
"title": "所在地",
"properties": {
"city": {
"type": "string",
"default": "サンフランシスコ"
},
"state": {
"type": "string",
"default": "CA"
},
"citystate": {
"type": "string",
"description": "これは前の 2 つのフィールドから自動生成されます",
"template": "{{city}}, {{state}}",
"watch": {
"city": "location.city",
"state": "location.state"
}
}
}
},
"pets": {
"type": "array",
"format": "table",
"title": "ペット",
"uniqueItems": true,
"items": {
"type": "object",
"title": "ペット",
"properties": {
"type": {
"type": "string",
"enum": [
"猫",
"犬",
"鳥",
"爬虫類",
"その他"
],
"default": "犬"
},
"name": {
"type": "string"
}
}
},
"default": [
{
"type": "犬",
"name": "ウォルター"
}
]
}
}
}
```
すべての JSON Schema はオブジェクトで構成されます。各オブジェクトには少なくとも type と name が必要です。
### 型
#### オブジェクト
他の子オブジェクトを含む「複合」オブジェクトでは、 **object** 型を使用します。この例では、スキーマのルートノード「人」がこの型です。
必須フィールドは **required** キーワードを使って定義できます。これらのフィールドもスキーマ内で定義する必要があります。
使用します **properties** を使って、必要な各フィールドの機能を記述します。これには型と名前の指定が含まれます。
#### 配列
配列を使うと、同様の **項目** をリストに複数追加できます。項目の型などを記述するには、 **項目** キーワードを使用します。
#### String
単なるテキストです。これには **default** キーワードを使ってあらかじめ値を設定できます。
特定の値だけを許可するには、 **enum** キーワードを使ってあらかじめ値を設定できます。
---
# Agent Instructions
This documentation is published with GitBook. GitBook is the documentation platform designed so that both humans and AI agents can read, navigate, and reason over technical content effectively. Learn more at gitbook.com.
## Querying This Documentation
If you need additional information that is not directly available in this page, you can query the documentation by asking a question.
Perform an HTTP GET request on the following URL with the `ask` and `goal` query parameters:
```
GET https://docs.realmjoin.com/ja/to/self-service-forms.md?ask=&goal=
```
`ask` is the immediate question: it should be specific, self-contained, and written in natural language.
`goal` is what the user is ultimately trying to achieve, the reason they need the answer. Sharing it helps GitBook give you a better, more relevant answer. A goal is most helpful when it describes the outcome the user wants rather than restating the question. For example, with `ask=how do I create an API token`, a goal like `automate deployments from our CI pipeline` lets GitBook tailor the answer to that use case.
The response will contain a direct answer to the question and relevant excerpts and sources from the documentation.
Use this mechanism when the answer is not explicitly present in the current page, you need clarification or additional context, or you want to retrieve related documentation sections.